|
|
Chapter 1: Scanning Text and Images
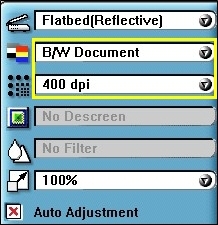
Note: We use WOCAR 2.5 to scan our images in TIFF format using the compression scheme CCITT Group 4. WOCAR automatically defaults to this setting and format. 1. From the Start Menu, select Programs, and open WOCAR. You may also double click the WOCAR shortcut icon on your desktop if you have one. 2. From the toolbar at the top of the screen, click File, and select Scan Image. 3. After the VistaScan screen displays, be sure you are in the Advanced setting for scanning by checking if the Advanced button is highlighted in blue (see Figure 1). Figure 1: Advanced button 4. Check the default settings on the right side of the VistaScan screen (see Figure 2). They should read as follows: Flatbed (Reflective) B/W Document 400 dpi No Descreen No Filter 100 % X Auto Adjustment
Figure 2: Settings for scanning text 5. Place your document on the scanner bed and try to align the edges of the page as best you can with the rulers on the scanner to make the scanned image as straight as possible. 6. Click Preview. Wait for the scanner to warm up. 7. Once the scanned image appears on the VistaScan screen, a box with a dashed-line border should also show up around the image (see Figure 3). Use this box to adjust the size of the image. Try to leave about a 1/4 inch margin around the text. For more information about adjusting the size of the dashed-line box, see the Helpful Hints section for this chapter.
Figure 3: Dashed-line box around scanned text 8. Click the Scan button located directly beneath the Preview button. The VistaScan screen will disappear, and the scanned image will come up on the WOCAR screen. 9. When a dialog box displays asking if you to want to acquire another page, click No (see Figure 4).
Figure 4: Acquire another page dialog box 10. Using the up/down and left/right scroll arrows (see Figure 5), check the scanned image to be sure all of the desired text shows up. If not, you may need to adjust the document on the scanner bed or adjust the dashed-line box in the VistaScan screen. Try to scan the document again until all of the selected text shows.
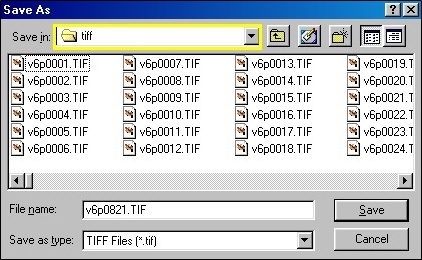
Figure 5: Scrolling arrows 11. Once you have properly scanned the document, it is time to save that image. On the toolbar at the top of the WOCAR screen, click File and select Save As. Name the file according to its volume number and page number. Save it as a TIFF (.tif) file. Be sure to save the image to its proper folder. For example, if you scan Volume VI, page 821 of Kappler's, in the Save As dialog box, use the drop down menu in the Save In box (see Figure 6) to select the L (l:) drive: (l:)>Digitization>Kappler>vol6>images>tiff
Figure 6: Save in box highlighted in yellow Once you reach this area, name the document you have just scanned v6p0821.tif Note: Remember to make the page number a four-digit number because some volumes contain more than 1000 pages.
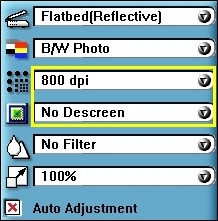
How do I scan an image (photograph, drawing, map, etc.)? 1. From the Start menu, click Programs, and double click VistaScan. Then select either VistaScan or VistaScan (2); both will bring up the same program. You can also open the program if you have a shortcut icon on your desktop. 2. After the VistaScan screen appears, be sure you are in the Advanced setting scanning by checking if the Advanced button is highlighted in blue (see Figure 1). 3. Change the default settings on the right side of the VistaScan screen (see Figure 7). They should read as follows: Flatbed (Reflective) B/W Photo 800 dpi No Descreen No Filter 100 % X Auto Adjustment
Figure 7: Settings for scanning images
4. Place your document on the scanner bed and try to align the edges of the page as best you can with the rulers on the scanner to make the scanned image as straight at possible. 5. Click Preview. 6. Once the scanned image appears on the VistaScan screen, a box with a dashed-line border should also show up around the image. Use this box to adjust the size of the margin of the image. Try to leave about a 1/4 inch margin around the text. For more information about adjusting the size of the dashed-line box, see the Helpful Hints section for this chapter. 7. In the upper right corner of the VistaScan screen, click the scanner button, which is the first button of the three (see Figure 8). This action brings up the Preferences dialog box.
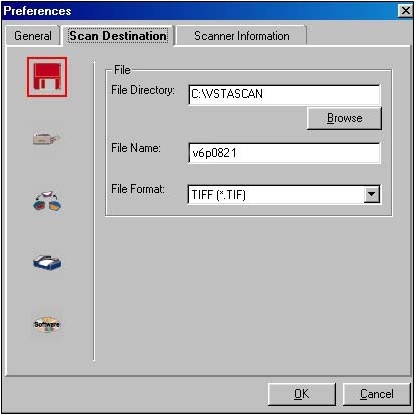
Figure 8: Scanner button highlighted 8. In the Preferences dialog box (See Figure 9) click the second tab labeled Scan Destination.
Figure 9: Preferences dialog box, Scan Destination tab The File Directory box allows you to tell VistaScan where to send the scanned image. The File Name box lets you type in the name you want to save the image as. The File Format box is where you tell the program to save the image as a TIFF (.tif) file. 9. First, you need to tell VistaScan where to send the scanned image, so click the Browse button under the File Directory box. This action brings up the Browse dialog box (see Figure 10).
Figure 10: Browse dialog box, L drive selected In the Drives box at the bottom, select the proper driver first, which should be the L drive since that is where the EPC stores all of it information. Use the scroll bar to find the L drive (l:\\...\PROJECT, as seen in Figure 10.) 10. In the Folders section of the Browse dialog box, select Digitization, then the name of the project the scanned image belongs to, the volume number, images, then the tiff folder. For example, in Figure 10, if you were saving an image to the tiff folder of images for Kappler Volume VI, you would highlight in this order: (l:)>Digitization>Kappler>vol6>images>tiff 11. Click OK. 12. After you click OK, you will be back at the Scan Destination box. Now it is time to name your scanned image. Naming photographs, maps, drawings and so forth is very similar to naming text documents, but you must indicate that these are photos, not text. However, you must make this indication after you have named the file for its volume number and page number. Note the difference in the file names of Figures 11 and 12. Figure 11 represents the file name before adding "photo," and Figure 12 represents the file name after adding "photo."
For example, let's say that you have scanned an image from Kappler, Volume VI, page 822. In the File Name area of the Scan Destination box you would type in v6p0822.TIF. When you rename the file, though, you will type in v6p0822photo.TIF. 13. Now, in the File Format section of the Scan Destination box, use the drop down menu to select TIFF (.tif). For scanned images, you will always save the image as a TIFF file. 14. Click OK at the bottom of the Scan Destination box. 15. Click Scan.
1. Close VistaScan. 2. Click the My Computer icon on your desktop (see Figure 13) and select the L (l:) drive.
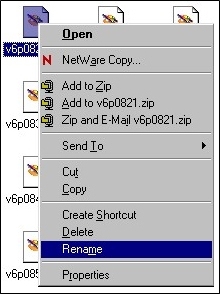
Figure 13: Example of My Computer icon 3. Choose the Digitization folder within the L (l:) drive and select the project folder you need. From the project folder, choose the correct volume folder, and within the volume folder, choose the images folder, then the tiff folder. For example: (l:)>Digitization>Kappler>vol6>images>tiff 4. Once in the tiff folder, find the image you saved according to its volume number and page number. Place your mouse cursor over this file and right click. 5. The file name will highlight in blue so you know you have selected the right one, and a menu should appear with several options (see Figure 14).
Figure 14: Right-click menu with Rename option highlighted Select Rename near the bottom of this menu. 6. The old file name should appear highlighted in blue, and a blinking cursor should also be inside the box around the file name. Use the arrow keys or your mouse to move this cursor to the end of the page number of the file name, but keep the cursor in front of the period before the (.tif) extension. 7. Now type the word "photo" so that your new file name clearly indicates that this file is a photo. For example: v6p0821 to v6p0821photo.tif 8. Press Enter on your keyboard. 9. Close this window.
|