|
|
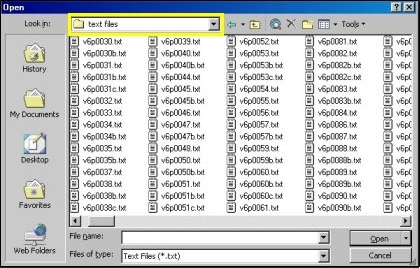
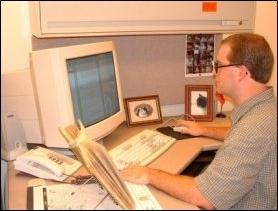
Chapter 3: Proofreading a DocumentHow do I proof a document? 1. Open Microsoft Word. Note: We recommend using Microsoft Word, but you can use any other word processor of your choice, such as Notepad or Wordpad. 2. Open the document you need to proof in Word. From the toolbar at the top of the Word screen, click File, select Open. You can also use the open folder icon in the toolbar (see Figure 1). Figure 1: Open folder icon The Open file dialog box displays. At the top of this box is a Look in drop down menu. From this menu, select the L drive, the Digitization folder, the proper project folder, the proper volume folder, and text files. For example, if you or someone else has already scanned and OCR'd the third article on page 821 of Volume VI of Kappler, and you wanted to proof it, use the Look in drop down menu to make the following selections: (l:)>Digitization>Kappler>vol6>text files>v6p0821c.txt (see Figure 2) Figure 2: Open file dialog box, with Look in drop down menu highlighted 3. Look at the original hard copy of the document that was scanned. Examples would be the actual volumes, journals, encyclopedias, and so forth. 4. The exact specifics for setting up a document may vary from project to project, but the general idea is to make the text file resemble the original document as closely as possible. Setting up the text file may include lining up the headings of each page, adding page numbers, inserting and deleting line breaks, and so on. 5. The most important step in proofing a document is carefully reading over the entire text file. 6. Read the text file and compare it with the hard copy of the document. 7. Check all figures, numbers, misspelled words and so on with those in the hard copy. If the OCR'ing software changes any words, numbers, symbols and so on, make the necessary edits. However, if a word is spelled incorrectly in the original hard copy of the document, you must leave this word spelled incorrectly in the text file. Figure 3 shows a person using the original document to compare with the text file. Figure 3: Proofing the text file by comparing it with the original document Note: Saving the document as a Text Only w/ Linebreaks file will make the document automatically open in a 10 point Courier New font. If you need to change the type or size of the font to read the text more easily, you can do so in the word processor. However, when you save and close the document, it will revert to the default size and type font the next time the file is opened.
|